Design & Best Practices
QR Codes on Packaging & Curved Surfaces
Packaging is the hardest environment a QR code routinely has to survive. The surface curves, the substrate absorbs ink unevenly, the finish adds glare, the label may be applied slightly crooked, and the whole thing gets handled before anyone scans it. This guide covers the physical and print-production side of that problem.
This page is about the physical production problem — substrates, curvature, print processes, finishes. If you're looking at what to do with a code on a product (what to link to, how it fits a retail campaign, what customers expect), that's covered separately in QR codes for retail & product packaging.
The short version
- Curvature is recoverable — scanners solve for it using alignment patterns — but tolerance collapses on tight radii.
- Never use a version 1 code on a curved surface. It's the only version with no alignment pattern at all.
- Orient the code so its rows run along the curve, not across it, where you have the choice.
- Matte beats gloss every time. Gloss varnish and lamination add glare that can hide a code entirely.
- Size up for packaging. Every other factor here eats margin, so start with more.
- Keep codes off seams, folds, shrink-wrap distortion zones and the curve's edges.
What curvature does to a code
Wrap a code around a bottle and the modules no longer sit on a regular grid from the camera's point of view. They compress progressively toward the left and right edges, where the surface is turning away.
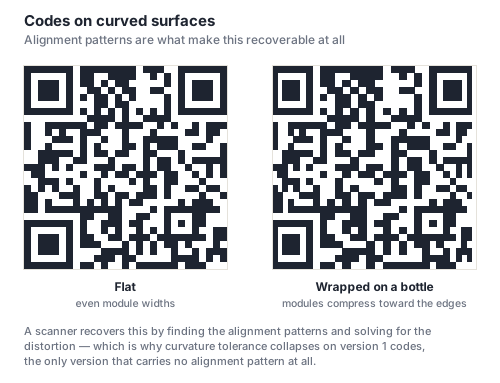
Scanners handle this, up to a point, using alignment patterns — the smaller square markers distributed through the grid. Having several known reference points lets the decoder fit a transform that maps the distorted image back to a regular grid before sampling. This is precisely the job those patterns were added for, and it's why they scale in number with code size.
Two consequences follow directly:
- Version 1 codes (21×21) carry no alignment pattern at all. They have only the three finder patterns, which is enough to correct a flat perspective skew but not a curve. Never put a version 1 code on a curved surface — and since version is chosen automatically from your payload, a very short payload can hand you one without asking.
- Larger codes tolerate curvature better, because they carry more alignment patterns and therefore more reference points across the distorted area.
How much curve is too much
The practical measure is how much of the code's width wraps through the visible arc. Keep the code within roughly the front 60–70° of the curve and it behaves. Push toward the sides of a cylinder and the outer columns compress until adjacent modules become indistinguishable — which is a resolution failure, not a distortion one, and no decoder can undo it.
| Container | Typical diameter | Guidance |
|---|---|---|
| Large jar, tin, wide bottle | >80 mm | Straightforward — treat close to flat |
| Standard drinks can / bottle | 50–70 mm | Fine if the code stays ≤25 mm wide and centred on the face |
| Slim can, small jar | 35–50 mm | Tight. Keep the code small, centred, and test on the real container |
| Tube, vial, pen, cable | <30 mm | Use a flag label or an end cap — don't wrap |
For genuinely narrow cylindrical items the standard answer is a flag label — a tab that folds out flat from the surface — or moving the code to a flat end. Fighting the curve on a 20 mm tube isn't a design problem you can solve with a bigger code.
If you can choose, rotate the code so its rows run along the axis of the curve rather than across it. A code on a bottle distorts in the direction of the wrap; aligning the grid so the distortion falls along one axis rather than diagonally gives the decoder a cleaner transform to solve. On a vertical bottle that usually means keeping the code upright and narrow rather than wide.
Substrates and finishes
What you print on changes the code as much as how you print it.
| Substrate | Behaviour | What to do |
|---|---|---|
| Coated paper / label stock | Minimal ink spread, crisp edges | Standard sizing is fine |
| Uncoated / kraft | Absorbs ink, modules bleed outward | Increase module size 25–50%; kraft's brown ground also costs contrast |
| Corrugated board | Ribbed surface, coarse print | Go significantly larger; align the code so flutes run along one axis |
| Films and flexible plastic | Ink sits on top; can wrinkle or stretch | Keep clear of areas that flex or crease in the pack |
| Shrink sleeves | Distorts non-uniformly as it shrinks | Place only in low-shrink zones; pre-distortion must account for the code |
| Metal / foil | Highly reflective | Matte white patch behind the code; never print directly on bare foil |
| Glass | Reflective and transparent | Opaque white backing layer under the code |
Finishes
- Matte is the safe default. It scatters light and keeps the code readable at any angle.
- Gloss varnish and lamination add glare, and glare doesn't reduce a code's readability gradually — at the wrong angle it obliterates a region of the code entirely. If the piece must be gloss, ask for a matte spot varnish over the code area. It's a routine request and it's the single highest-value production decision on this page.
- Soft-touch coatings behave like matte optically and are fine.
- Embossing or debossing across a code destroys it. Keep well clear.
Print processes
Packaging rarely uses the sheet-fed offset that a brochure would, and the alternatives have coarser tolerances.
- Flexography — dominant for labels and flexible packaging. Prone to dot gain, which thickens dark modules into light gaps. Budget for it: increase module size, and ask whether the plate compensation curve accounts for a code.
- Rotogravure — long-run flexible packaging, generally good reproduction, but engraved cells can soften fine module edges. Keep modules comfortably above the floor.
- Digital / inkjet — excellent for codes, and the only process that easily supports serialised codes where every unit differs.
- Thermal transfer — common for applied labels and variable data. Quality depends heavily on ribbon and print speed; slow the print and verify with a scan, since a worn printhead degrades codes before it degrades legible text.
- Direct-to-shape / laser marking — lower contrast than ink by nature. Size up substantially and verify on the real material.
Across all of these, submit vector artwork (SVG, PDF or EPS) rather than raster. Packaging is often scaled at plate-making, and a raster code scaled up is a blurry code. Our download guide covers the available formats.
Placement
Where a code sits on a pack decides whether anyone can scan it in a shop, holding the product in one hand.
- Keep clear of seams, folds, glue flaps and crimps. A code crossing a seam is distorted unpredictably and often physically damaged.
- Stay away from the curve's edges. Centre it on the visible face.
- Avoid high-wear zones — the base of a bottle, the corners of a carton, anywhere that scuffs in transit.
- Don't place it directly beside a retail barcode. Some scanning apps lock onto whichever symbol they find first, and a confused scan is a lost one.
- Leave a real quiet zone. Packaging layouts are crowded and this is the first thing squeezed. Four modules, minimum, and never let ingredient text run up to the edge.
- Think about how the product is held. A code on the underside of a heavy jar is technically present and practically unscannable.
Before the run
Everything in the pre-print checklist applies, plus these packaging-specific steps:
- Test on the real container, not a flat proof — apply the actual label to the actual shape.
- Test under retail lighting. Supermarket overheads are bright and directional and are where glare shows up.
- Test one-handed, holding the product as a shopper would.
- Test a unit that's been through the packing line, so you're seeing real handling wear.
- For shrink sleeves, test a fully shrunk unit. A flat sleeve proof tells you nothing.
And use a dynamic code. Packaging has the longest lead time and the longest shelf life of any printed material — the destination will almost certainly need to change while units are still in circulation.
Frequently asked questions
Do QR codes work on curved surfaces like bottles and cans?
Yes, within limits. Scanners correct curvature using the code's alignment patterns, which give the decoder enough reference points to fit a transform and sample the grid correctly. It works well on containers above roughly 50 mm diameter if the code is centred on the visible face and kept modest in width. Below about 30 mm diameter, use a flag label or a flat end instead of wrapping.
Why does my QR code fail on a small tube but work on a jar?
Tighter radius means the outer columns of modules compress harder, until adjacent modules become indistinguishable to the camera. That's a resolution failure rather than a distortion one, so no decoder can recover it. It's also worth checking the version: very short payloads produce version 1 codes, which carry no alignment pattern at all and have essentially no curvature tolerance. Lengthening the payload slightly, or raising the error correction level, pushes it to version 2+ and helps measurably.
Can I put a QR code on glossy or foil packaging?
Yes, with a specific fix in each case. For gloss, request a matte spot varnish over the code area — glare is the failure mode, and matte eliminates it. For foil or metal, print the code on an opaque matte white patch rather than directly on the reflective surface. Bare foil under a code reflects the ambient light straight back into the camera and can hide part of the pattern completely.
How big should a QR code be on product packaging?
At least 2 cm (0.8 in) square including its quiet zone for a code scanned at arm's length, and larger than that for packaging specifically, because curvature, substrate and finish all consume margin the flat-surface guidance assumes you have. On uncoated or corrugated stock, increase module size 25–50% over the flat-print minimum. See the sizing guide for the underlying distance rule.
Can a QR code go on a shrink sleeve?
It can, but it's the most demanding case here, because shrink film distorts non-uniformly — different zones contract by different amounts depending on the container's profile. The code must sit in a low-shrink zone and be included in the pre-distortion artwork rather than added afterwards. Always test on a fully shrunk unit on the real container; a flat proof of a sleeve tells you nothing about the finished result.